|
02/01/2022 |
|||||||||||||||||||||
|
|
|||||||||||||||||||||
|
Quick Links |
|||||||||||||||||||||
|
This page is undergoing updates - uploaded as completed. |
|||
|
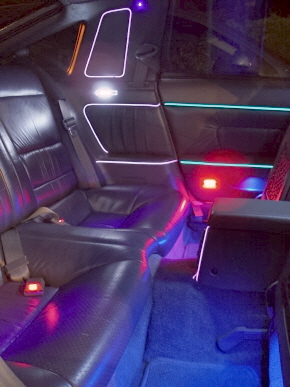
This is the interior part of the site, this takes on the biggest mods of the car - my electronics! all the panels and various mods you see here are manufactured by myself, its a constant ongoing project. All the panels you see are designed on a PC and printed out as displays on various types of plastics. I have mastered the art of making membrane type panels with buttons hidden under the membranes, this allows me to give them a factory fitted look. All bulbs in the car bar headlights & fogl ights are now LEDs not filament lamps. |
 |
|
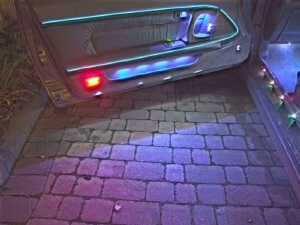
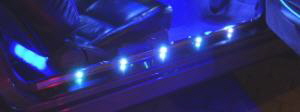
The interior itself is blue leather on grey trim. The pedals have been replaced, steering wheel, gear shift & the stereo has found a new home built into the roof. The entire interior of the car is lit up blue with EL piping picking out some of the details on the doors and rear seating areas. The wire itself can be cut to any length, all you need to do is keep enough at the end to make the electrical connection. To find out more about EL wire Click Here! |
|
|
|
|

|
The following part of the page is yet to be updated! - Coming soon tho! |
|
I have never been a fan of car keys so decided to do something about it. The Supra no longer has a key, instead it has a clear round plastic transponder about 1.5” long. This fits into a holder where the old key start was, when inserted it lights up blue and is read by the control unit, this then switches the power onto the entertainment system and brings the panel mounted on the steering wheel alive. |
|||||||||||
 |
|||||||||||
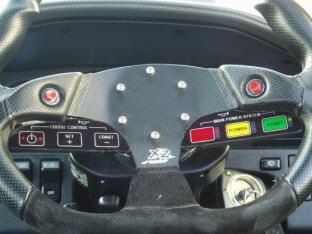 |
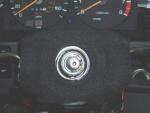
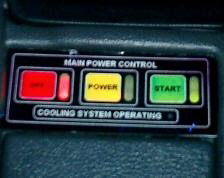
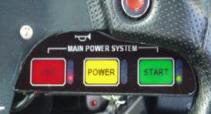
This panel lights up with green illumination and has 3 coloured buttons on one side, red is off, yellow is power, green is start. |
||||||||||
|
When pressed, the yellow button will just turn the ignition system on, this allows you to operate the windows etc, when the green button is pressed the car will start, off obviously turns the engine and ignition off, also if the transponder is simply pulled from its holder the car will also shut down, quick and simple! |
|||||||||||
|
I managed to fit the panel to the wheel by means of a metal bracket cut to shape and some shaped acrylic. |
|||||||||||
|
|
|
|
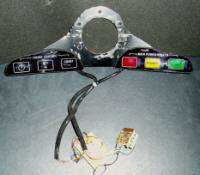
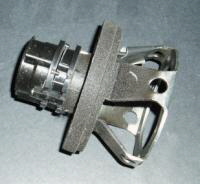
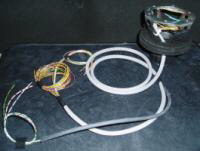
A loom that coiled around the steering shaft, bit like a racing cars system. The loom is very flexible and wrapped with a braided nylon sleeve, this allows the loom to slip past itself as the wheel is turned. To prevent chaffing the inner part of the steering column has been partitioned making a void for the loom to coil up in, this is lined with felt. |
|||||||||||
 |
|||||||||||
 |
|||||||||||
|
Housed within the boss are a couple of small circuit boards which run the two |
|||||||||||
 |
|||||||||||
|
wheel mounted panels, the rest of the starting control is mounted elsewhere in the dashboard. The switch module itself is only 6 mm in depth, this prevents it from getting in the way when driving! |
|||||||||||
|
|
|
The idea of having LEDs next to the power switches is to indicate which one is operational at any time, eg, if the car is running the only switch that will do anything is the off switch so, a pair of LEDs next to it flash to indicate that is the only switch that will operate. |
 |
|||||||||
|
Before the wheel mounted system I had the same thing fitted in the centre console infront of the gear stick, when I changed the steering wheel it gave me the chance to put it in the wheel. Because the new wheel meant loosing the cruise control buttons I made the panel on the right hand side of the wheel operate the cruise, this has the same buttons on as the original wheel with the addition of LEDs that light up each side of the power button when cruise is selected. |
|||||||||
 |
|||||||||
|
I also designed a remote control starting system, this is triggered from my alarm key fob, the first button does the alarm and doors and the second when pressed will start the car. I made a circuit up that interfaced with the ECU so the car knew when to crank the engine and when to stop, the system is the same used when you press the start button, this allows a quick press of the button and the car cranks automatically till the engine fires. The system has a few safety devices built in so when the car is running with no key, should anybody try and move it, the car will just shut off, also a system prevents the car from being started remotely when its in gear. The system has served me well, future plans will hopefully see some of the sterio controls in the wheel also. |
|||||||||
 |
|||||||||
|
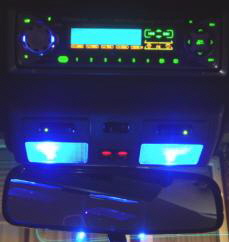
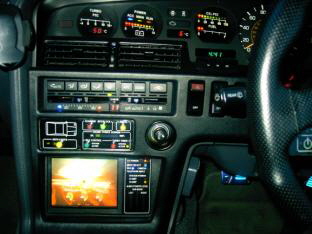
As described in the ICE section, I fitted the front panel of the stereo into a roof mounted panel. The rest of the head unit lies behind the front TV,. The head unit has several inputs to it, one is my mobile, the phone sits in a small cradle with the hands free wire plugged in. When I get a call I push a button in the cradle, this then relays the mobile sound onto the main sound system, a very clear hands free kit! |
 |
|||||||
|
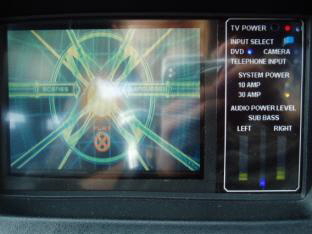
The panel next to the TV has various functions, these are: Left, right and sub level indicators at the bottom, A/V system power supply status, |
||||||||
 |
||||||||
|
TV power, TV input select and rear screen power status. There is also a remote sensor for the TV remote. The panel is back lit green. I built a dimmer system for all the courtesy lighting, this is a slow dim effect when they go off. The two black buttons here either turn all the courtesy lighting off, handy when working on the car, or they turn it all on. |
||||||||
|
|
|
|
|
|
|
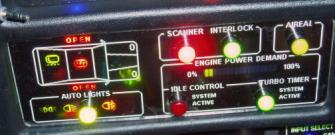
The system works perfectly, there is a built in hysteresis to prevent the lights going on and off in dusky conditions, you can also override the system using the normal light switch. The car picture indicates open doors, heated rear window and wiper status, lighting switched on and the status of the main engine fans. Symbols light up inside the car depending on what is being indicated, e.g.’ when the engine fans come on a blue fan symbol lights up on the bonnet. The bar graph display shows the fuel mixture from the O2 sensor output. |
|
|

|
I made up LED strips to go behind the heater and fan controls picking the blue and red heat markers out with separate blue and red lamps. In the centre of the panel I fitted a cabin temperature display, the sensor for which is mounted in the same place as the one for the climate control (in front of passenger above glove box|) In-between the two A/C switches I have fitted a red LED, this indicates when the A/C compressor is engaged, it fits flush with the original trim so is invisible when off. |
|
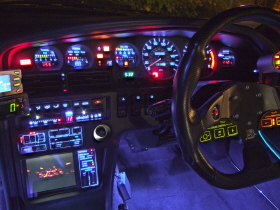
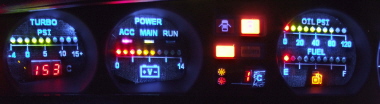
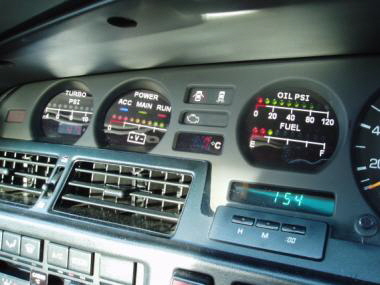
Not having a digital dash and being an avid Knight Rider fan, I took it into my own hands to build one! This is the 2003 version, I am working on a 2004 version as we speak. The design is simple, incorporating all the old instrumentation into some new displays. The Turbo panel displays the boost from -5 to + 15 psi using a bar graph, I also included a digital read out for |
|||||||||||
 |
|||||||||||
 |
|||||||||||
|
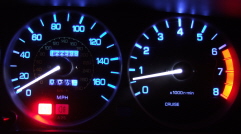
Turbo temperature, the sensor for this is mounted on the turbo bearing housing. The power meter displays the battery voltage and also indicates what is on, so ACC, IGNITION POWER and RUNNING. I incorporated an outside temperature display above the clock, this also has symbols that light up to indicate frost and ice conditions. The oil PSI and fuel are also displayed on bar graphs, it took a bit of modding to the sender units on both but, we got there in the end! The water gauge is in its original position, this also incorporates a digital temperature readout. I made up “T” pipe that fits in the cooling system, |
|||||||||||
 |
|||||||||||
|
this has a sensor built into it which relays the temperature to the dash readout. All the electronic PCBs are mounted in a small box which sits behind the instrument cluster. The new 2004 unit will hopefully have all the electronics built in and also have digital taco and speedo. The design of the first digital dash made use of the original gauge placements, this was so the old dials could be re installed. I now have three of these instrument clusters so the new dash will be a bit more adventurous as, I do not need to worry about damaging my original instrument cluster! |
|||||||||||
|
|
||||||||||||||||||||||||||


|
t’s been an enjoyable project, there is so much fitted to the Supra, that electronics are easy to interface with the car, you just need to be able to work out the circuits that Toyota have fitted as no info is ever available for the actual PCBs. The next version should include a digital speedometer and tacho along with other displays from different panels in the car, this will free up space to include more features in the car. |
|
|
|
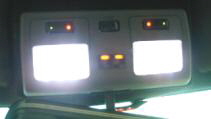
Here you can make out the illumination fitted to the mirror, seat, gear shift and stereo remote, you can almost see the recess for the armrest illumination too but it’s not clear. When you open the coin pot or arm rest inside has hidden illumination too. I shortened the gear stick of my Supra by removing the top half of it, this makes the change much shorter and much crisper similar to the new Supra. The knob is a universal clamp type. |
||||||||
 |
||||||||
 |
||||||||
 |
||||||||
|
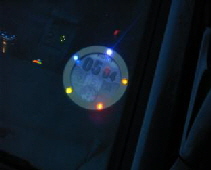
Even my tax disc holder got the LED treatment, I was able to fit tiny surface mount lamps where the screws normally go, I used the same tiny LEDs to illuminate the sterio remote keys. |
||||||||
|
|||||||||||||||||||||||||||||||||||||||||||||||||||||||||||||||||||||||||||||||||||||||||||||||||||
|
If you found this guide helpful or have a comment, please sign my Guest Book or use the Message Board. |
|||||||||||||||||||||||||||||||||||||||||||||||||||||||||||||||||||||||||||||||||||||||||||||||||||


