02/01/2022

Quick Links

MKIII Supras

TEWD

TSRM

EPC

Cygnus Tech

Groupama Saga

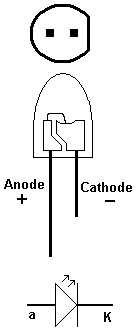
LEDs can replace pretty much all bulbs on a car with just a little tweaking here and there!  Advantages include higher brightness, extremely long life, ultra low power consumption and super resilience to shock and weather.

So, Lets not go too much into how or why these work, instead lets work on how to use them.

Firstly you need to know what to put where!  Here you can see an outline of the LED, this shows how to identify the positive (anode) and negative (cathode) parts of the package.

When wiring these up to a DC power source because these are a type of diode so, current only flows in one direction,  you will need to get this the correct way round otherwise there is no light output!

LEDs take tiny amounts of current, about 20MA on average so, to work them from 12 volt you must use a resistor in line with the LEDs, this can go on either the positive or negative leg of the LEd depending on what’s easy for you during fitting.

Depending oh how you wire the LEDs the resistor can change accordingly, the best way when using multiple LEDs driven off the same circuit is to wire them in series:

When using 12 volts as the supply the maximum number of LEDs I would recommend to wire in series and keep a constant brightness would be 4 although depending on the particular type of LED 5 is also possible, depends on the voltage draw.

Resistor wise the values need to be approx.: (based on blue or white LED)

1 LED

470 ohm

2 in series

250 ohm

3 in series

150 ohm

4 in series

80 ohm

These values are pretty close to a good all rounder to run the LEDs happily, its always better to have a safety margin so the values here can be altered a little without causing damage.  If you have the complete specs of the LEDs your using then I suggest you use an on line LED resistor calculator such as the one HERE

LEDs make great replacements for standard bulbs however, built into the front of the package is a lens to focus the light output, this is fine for indication and pinpoint uses but a bit rubbish for general lighting.

To widen the beam output from the LEDs you can file down this top lens and polish up the front using a bit of wet and dry and finally some polish such as autosol or T cut.

Make sure you never file to close to the emitters inside the package!

At the least you want a 1 mm gap above the internal reflector of the LED so as not to damage it, its too easy to go mad on a bench grinder and break the small linking wire inside the package.

Personally I made up a little jig that the LEDs fit into, this allows me to grind the tops off quickly on a bench grinder at all the same ideal height, I can then polish the tops with wet and dry and finish with polish.

If you found this guide helpful or have a comment, please sign my Guest Book or use the Message Board.

If you found this guide helpful or have a comment, please sign my Guest Book or use the Message Board.

suprabar